做了多年业务开发和网络开发,对框架、网络访问、业务功能等有了一定认识,但是在分层开发体系下,工作都是在上层工作,离计算机核心(CPU/缓存等)却越拉越远,后续需要加强这方面的知识。本文尝试说明白CPU缓存体系中的假共享问题。
本文对CPU和Cache Line的知识主要参考了此文,感谢!
背景知识
随着多核架构的普及,对称多处理器 (SMP) 系统成为主流。例如,一个物理 CPU 可以存在多个物理 Core,而每个 Core 又可以存在多个硬件线程。以x86为例,1个x86CPU有4个物理Core,每个Core有两个 HT (Hyper Thread):
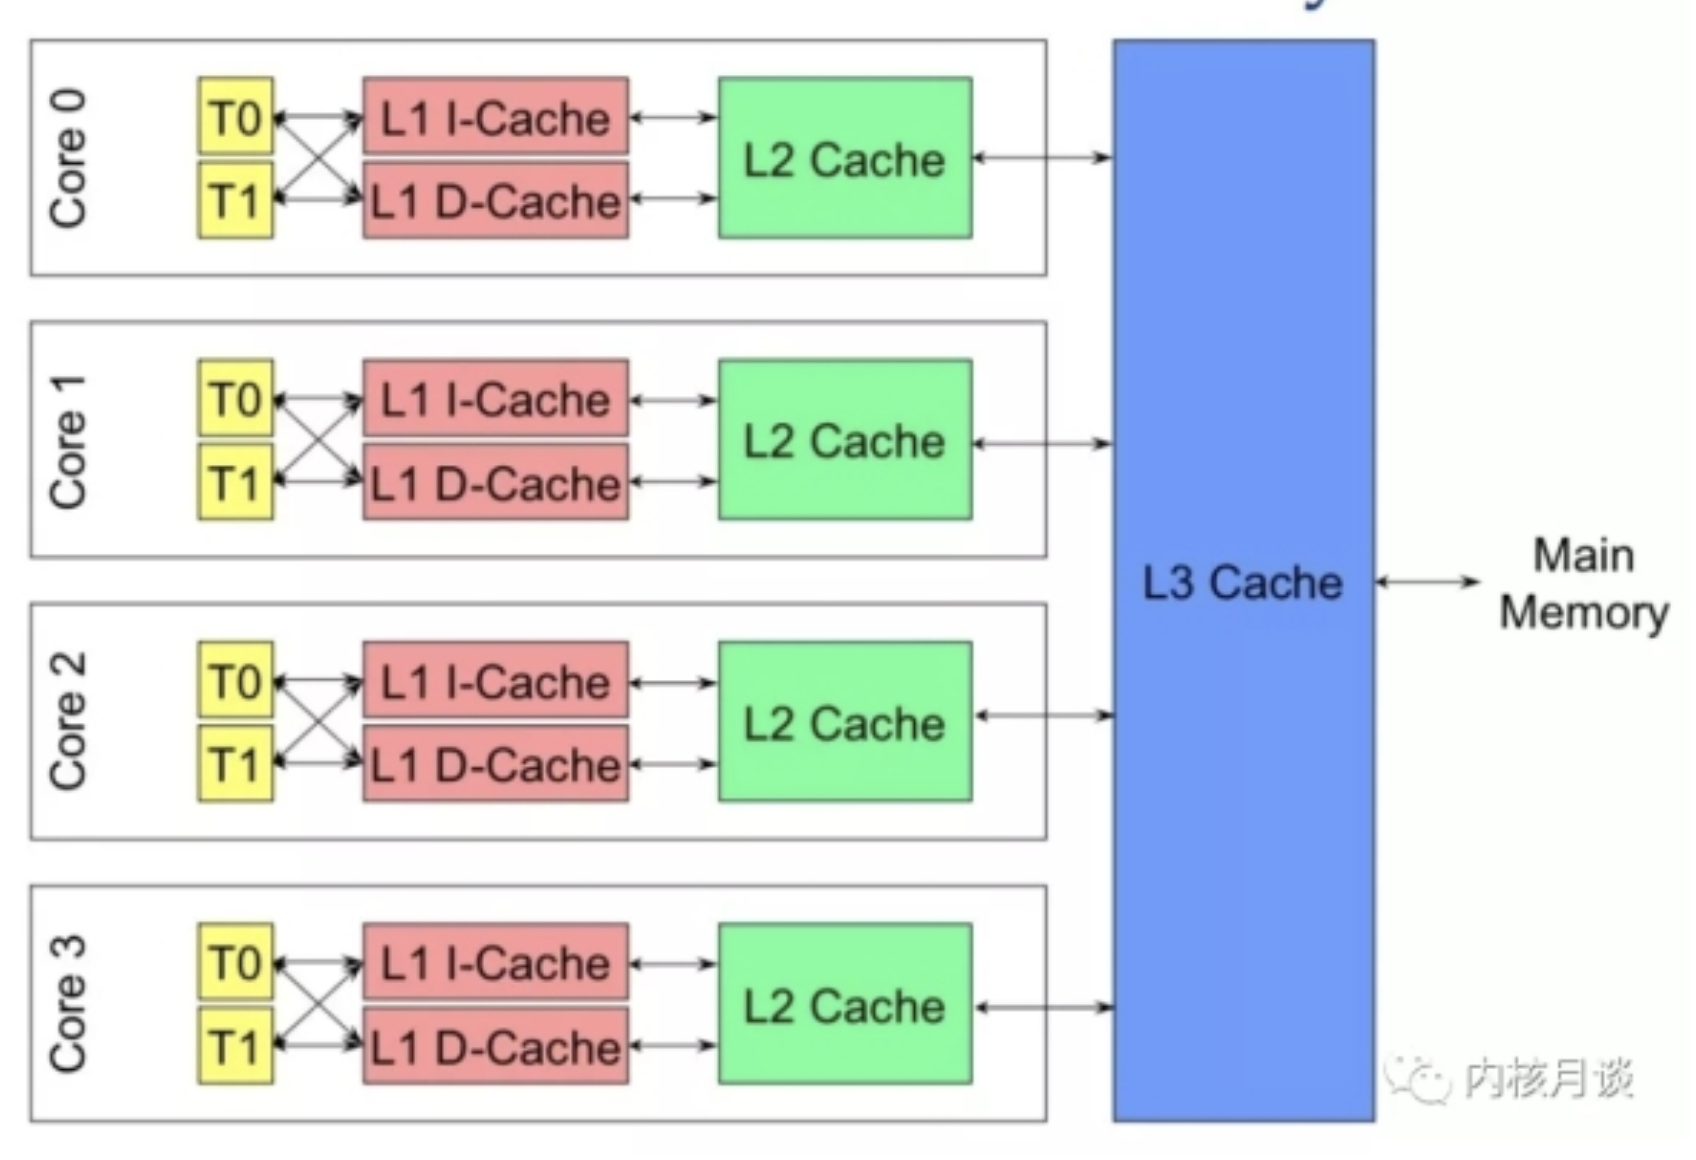
从硬件的角度,上图的 L1 和 L2 Cache 都被两个 HT 共享,且在同一个物理 Core。而 L3 Cache 则在物理 CPU 里,被多个 Core 来共享。
而从 OS 内核角度,每个 HT 都是一个逻辑 CPU,因此,这个处理器在 OS 来看,就是一个 8 个 CPU 的 SMP 系统。
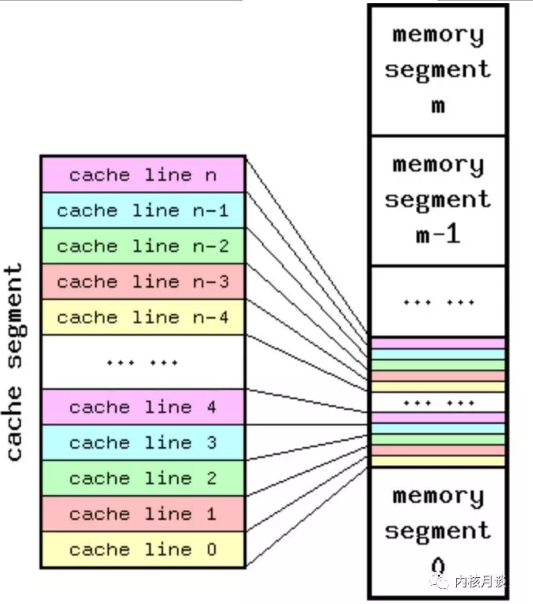
Cache Line 是 CPU 和主存之间数据传输的最小单位。当一行 Cache Line 被从内存拷贝到 Cache 里,Cache 里会为这个 Cache Line 创建一个条目。
这个 Cache 条目里既包含了拷贝的内存数据,即 Cache Line,又包含了这行数据在内存里的位置等元数据信息。
由于 Cache 容量远远小于主存,因此,存在多个主存地址可以被映射到同一个 Cache 条目的情况,下图是一个 Cache 和主存映射的概念图:
linux的getconf命令可以得到cache line的相关数据:
$ getconf -a | grep CACHE
LEVEL1_ICACHE_SIZE                 32768
LEVEL1_ICACHE_ASSOC                8
LEVEL1_ICACHE_LINESIZE             64
LEVEL1_DCACHE_SIZE                 32768
LEVEL1_DCACHE_ASSOC                8
LEVEL1_DCACHE_LINESIZE             64
LEVEL2_CACHE_SIZE                  262144
LEVEL2_CACHE_ASSOC                 8
LEVEL2_CACHE_LINESIZE              64
LEVEL3_CACHE_SIZE                  26214400
LEVEL3_CACHE_ASSOC                 20
LEVEL3_CACHE_LINESIZE              64
LEVEL4_CACHE_SIZE                  0
LEVEL4_CACHE_ASSOC                 0
LEVEL4_CACHE_LINESIZE              0
可以看到LINESIZE大小为64字节(大部分机器都是这么大) ASSOC表明Cache 是几路关联 (Way Associative) 的
问题提出
在 SMP 系统里,每个 CPU 都有自己本地的 Cache。因此,同一个变量,或者同一行 Cache Line,有在多个处理器的本地 Cache 里存在多份拷贝的可能性,因此就存在数据一致性问题。
通常,处理器都实现了 Cache 一致性 (Cache Coherence)协议。如历史上 x86 曾实现了 MESI 协议以及 MESIF 协议。
假设两个处理器 A 和 B, 都在各自本地 Cache Line 里有同一个变量的拷贝时,此时该 Cache Line 处于 Shared 状态。当处理器 A 在本地修改了变量,除去把本地变量所属的 Cache Line 置为 Modified 状态以外,
还必须在另一个处理器 B 读同一个变量前,对该变量所在的 B 处理器本地 Cache Line 发起 Invaidate 操作,标记 B 处理器的那条 Cache Line 为 Invalidate 状态。
随后,若处理器 B 在对变量做读写操作时,如果遇到这个标记为 Invalidate 的状态的 Cache Line,即会引发 Cache Miss,从而将内存中的数据拷贝到 Cache Line 里,然后处理器 B 再对此 Cache Line 对变量做读写操作。
Cache Line 伪共享问题,就是由多个 CPU 上的多个线程同时修改自己的变量引发的。这些变量表面上是不同的变量,但是实际上却存储在同一条 Cache Line 里。
在这种情况下,由于 Cache 一致性协议,两个处理器都存储有相同的 Cache Line 拷贝的前提下,本地 CPU 变量的修改会导致本地 Cache Line 变成 Modified 状态,然后在其它共享此 Cache Line 的 CPU 上,
引发 Cache Line 的 Invaidate 操作,导致 Cache Line 变为 Invalidate 状态,从而使 Cache Line 再次被访问时,发生本地 Cache Miss,从而伤害到应用的性能。
上面的描述在intel官方文档的中有更详细的说明:
False sharing occurs when threads on different processors modify variables that reside on the same cache line. This invalidates the cache line and forces a memory update to maintain cache coherency. Threads 0 and 1 require variables that are adjacent in memory and reside on the same cache line. The cache line is loaded into the caches of CPU 0 and CPU 1 (gray arrows). Even though the threads modify different variables (red and blue arrows), the cache line is invalidated, forcing a memory update to maintain cache coherency.
使用golang进行测试
本节示例来自于go under the hood,感谢!
false_sharing/main_test.go:
package main

import (
	"sync/atomic"
	"testing"
)

// pad 结构的 x y z 会被并发的执行原子操作
type pad struct {
	x uint64 // 8byte
	y uint64 // 8byte
	z uint64 // 8byte
}

func (s *pad) increase() {
	atomic.AddUint64(&s.x, 1)
	atomic.AddUint64(&s.y, 1)
	atomic.AddUint64(&s.z, 1)
}

func BenchmarkPad(b *testing.B) {
	s := pad{}
	b.RunParallel(func(pb *testing.PB) {
		for pb.Next() {
			s.increase()
		}
	})
}
true_sharing/main_test.go
package main

import (
	"sync/atomic"
	"testing"
)

// pad 结构的 x y z 会被并发的执行原子操作
type pad struct {
	x uint64 // 8byte
	_ [56]byte
	y uint64 // 8byte
	_ [56]byte
	z uint64 // 8byte
	_ [56]byte
}

func (s *pad) increase() {
	atomic.AddUint64(&s.x, 1)
	atomic.AddUint64(&s.y, 1)
	atomic.AddUint64(&s.z, 1)
}

func BenchmarkPad(b *testing.B) {
	s := pad{}
	b.RunParallel(func(pb *testing.PB) {
		for pb.Next() {
			s.increase()
		}
	})
}
go test -bench=.
两者的benchmark结果分别为:
# false sharing
BenchmarkPad-8   	30000000	        48.6 ns/op

# true sharing
BenchmarkPad-8   	50000000	        27.0 ns/op
有近1倍的差距!
结论
写关键性能代码,一定要注意cache line的false sharing的影响!